Make Your Own Pure Vanilla Extract: Only 2 Simple Ingredients
Imagine a vanilla extract so rich, so fragrant, and so utterly superior to anything you’ve ever bought in a store, that it transforms every baked good and sweet treat you make. What if we told you that creating this culinary magic doesn't require complex chemistry or specialized equipment, but rather hinges on a surprisingly simple process involving just two ingredients and a little patience? Welcome to the world of homemade pure vanilla extract, where quality, flavor, and cost-effectiveness converge. You’re about to discover how to craft the very best vanilla right in your own kitchen, effortlessly. This isn't just about saving money; it's about unlocking a depth of flavor that store-bought imitations simply can't replicate. The journey to making your own
two ingredient simple diy vanilla extract is not just easy, it's incredibly rewarding.
Why Homemade Vanilla Reigns Supreme: Flavor, Quality, and Cost Savings
For such a staple ingredient found in kitchens worldwide, vanilla extract often gets overlooked. Yet, its impact on the final taste of your dishes is profound. The difference between a truly high-quality vanilla and a subpar one is palpable, transforming a good recipe into an extraordinary one. When you opt for homemade vanilla, you're not just getting a better product; you're gaining control over its quality and purity.
One of the biggest eye-openers for many home cooks is the realization that many bottles labeled "vanilla" on supermarket shelves aren't pure vanilla extract at all, but *imitation vanilla*. This was a shock for us, too, when we started digging into food ingredients! These imitation products, often much cheaper, are typically made with a compound called "vanillin." While vanillin attempts to mimic vanilla's flavor, it's synthesized in a lab or derived from wood pulp – a far cry from the complex, nuanced aroma of genuine vanilla beans. Beyond the synthetic flavor, imitation vanilla often contains artificial colors, preservatives, and added sugars. These are unnecessary additives that detract from the natural purity and exquisite taste of real vanilla.
True, pure vanilla extract can be expensive at the store. The price tag is usually the easiest way to spot the real deal versus the imitation – if it's cheap, it's likely fake. But why pay a premium for commercially produced pure vanilla extract when making your own is so straightforward and, in the long run, far more cost-effective? With a little upfront investment in quality vanilla beans, you can produce a superior extract that will last for months, if not years, especially when you learn how to 'top off' your batch. The rich, authentic vanilla flavor you achieve at home isn't just worth the minimal effort; it actively elevates your culinary creations, making your baked goods taste incredible. For a deeper dive into the cost benefits and quality differences, explore
Homemade Vanilla: Cheaper & Better Than Store-Bought Imitation.
The Astonishingly Simple Process: Just Two Ingredients!
The magic of creating your own pure vanilla extract truly lies in its shocking simplicity. Forget complicated recipes or exotic equipment; all you truly need are two core ingredients: premium vanilla beans and a high-quality alcohol.
Choosing Your Vanilla Beans
The quality of your vanilla beans directly impacts the flavor of your final extract. There are several varieties, each offering unique aromatic profiles:
- Madagascar (Bourbon) Vanilla Beans: The most popular and classic choice, offering a rich, creamy, and sweet vanilla flavor. Perfect for an all-purpose extract.
- Tahitian Vanilla Beans: Known for their floral, fruity, and cherry-like undertones. Excellent for lighter desserts or fruit-based recipes.
- Mexican Vanilla Beans: Boasting a smoky, woody, and spicy profile, these beans add a distinct warmth to your extract.
- Ugandan & Indonesian Vanilla Beans: Often offer unique, robust, and sometimes earthy notes that can add complexity.
While you can experiment with different varieties, most home extract makers start with Madagascar beans for their universally loved flavor. Look for plump, moist, and pliable beans, ideally organic, for the best results. The general rule of thumb is to use 1 ounce of vanilla beans per 8 ounces of alcohol. For standard recipes, this means 5-7 beans per cup of alcohol.
To prepare the beans, simply slice them lengthwise down the middle, from just below the stem to the tip, leaving a small portion at the top intact. This exposes the tiny, flavorful vanilla seeds to the alcohol, allowing for maximum extraction. If using smaller bottles for gifting, you might cut the beans in half after splitting.
Selecting Your Alcohol Base
The second crucial ingredient is the alcohol, which acts as the solvent, drawing out the complex flavor compounds from the vanilla beans. The best choice is typically 80 proof (40% alcohol by volume) spirits. Higher proof can extract more quickly but might result in a harsher flavor; lower proof might not extract as effectively.
- Vodka: This is the most popular choice because of its neutral flavor profile. It allows the pure essence of the vanilla to shine through without any competing notes, making it incredibly versatile for any recipe.
- Bourbon: For a warmer, slightly smoky, and caramel-like vanilla extract, bourbon is an excellent choice. It pairs beautifully with rich desserts like chocolate cakes or pecan pies.
- Rum: Opt for a light or golden rum for a sweeter, subtly molasses-infused vanilla extract. This can be fantastic in tropical-inspired desserts or anything with a hint of spice.
- Brandy: Offers a fruity, slightly sweet, and aromatic base that can add intriguing complexity to your vanilla extract, especially good in fruit tarts or custards.
Choose an alcohol you enjoy drinking, as its subtle notes *will* transfer to your extract. However, for a truly versatile, pure vanilla flavor, vodka is generally recommended for your first batch.
The Simple Steps:
- Gather your chosen vanilla beans and alcohol.
- Slice the vanilla beans lengthwise, exposing the inner "caviar."
- Place the prepared vanilla beans into a clean, airtight glass bottle or jar.
- Pour the alcohol over the beans, ensuring they are fully submerged.
- Seal the container tightly.
That's it for the active part! The real work now begins with time and patience.
Unlocking the Magic: The Maturation Process and Storage
Once your beans are submerged in alcohol, the waiting game begins. This is arguably the "hardest" part, but it's essential for the alcohol to work its magic, slowly drawing out the hundreds of complex flavor compounds from the vanilla beans. This process, known as maceration, infuses the alcohol with the rich, aromatic essence we know and love as vanilla extract.
The Wait: Patience is a Virtue
While you might start to see a change in color within a few weeks, real vanilla extract needs time to fully develop its robust flavor. We recommend a minimum of 6-8 weeks for a usable extract, but for truly outstanding results, aim for 6 months to a year. The longer it sits, the deeper, richer, and more complex the flavor will become. Think of it like aging fine wine – time is its friend.
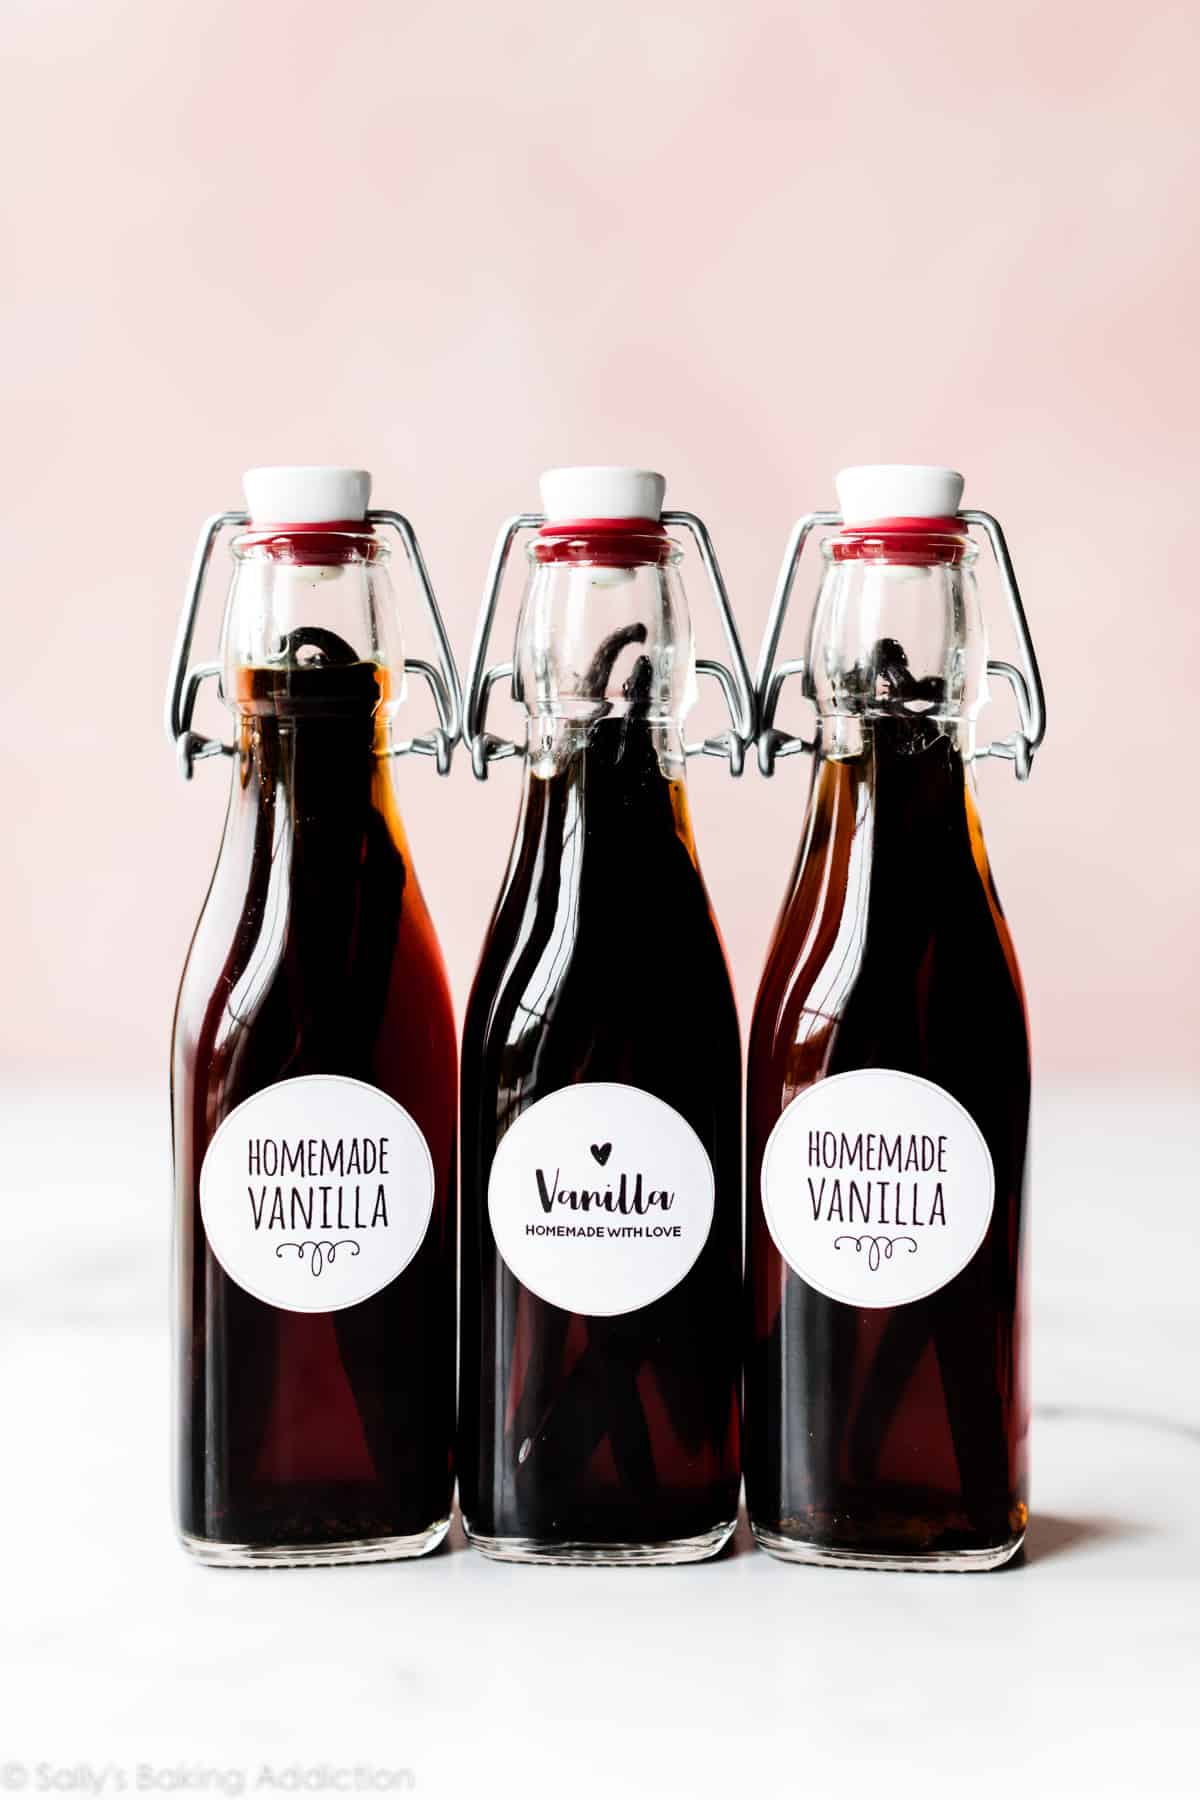
During this maturation period, store your jar in a cool, dark place, away from direct sunlight and heat. Giving the jar a gentle shake once a week or every few days helps agitate the beans and promotes even extraction. You’ll notice the liquid slowly darken from clear to a beautiful amber or rich brown, a visual sign that the extract is developing. The aroma will also deepen significantly over time.
Topping Off: Your Everlasting Vanilla Supply
One of the most remarkable benefits of homemade vanilla is its sustainability. Once you've used some of your extract, you don't necessarily need to start a whole new batch from scratch. You can simply "top off" your existing jar. As you use the extract, replace the volume with fresh alcohol. Every 6-12 months, or when the vanilla flavor starts to wane, you might want to add a fresh vanilla bean or two to invigorate the batch. This creates a perpetual vanilla extract supply, much like a sourdough starter, ensuring you always have a high-quality, flavorful extract on hand. Just remember to give it a few weeks for the new additions to infuse.
Beyond Your Kitchen: Homemade Vanilla as the Ultimate Thoughtful Gift
There’s an undeniable charm and warmth to homemade gifts, especially during the holidays or for special occasions. They convey a sense of thought, time, and effort that store-bought items often lack, making them truly special for your loved ones. And few homemade gifts carry the "wow factor" quite like a beautifully packaged bottle of pure vanilla extract.
Imagine presenting friends, family, or fellow foodies with a small, elegant glass bottle filled with your amber-hued, aromatic vanilla, complete with a custom-designed label and tied with a festive ribbon. It's a gift that speaks volumes – of your culinary care, your attention to quality, and your generosity. Making a large batch of
two ingredient simple diy vanilla extract for gifting is incredibly easy and efficient. You can easily scale up the process, turning a single endeavor into a thoughtful present for everyone on your list. For more ideas and inspiration on gifting your homemade vanilla, check out
Easy 2-Ingredient Vanilla Extract: The Perfect DIY Gift Idea.
Elevate Your Culinary Creations with Pure Homemade Vanilla
Once your homemade pure vanilla extract has matured, the real fun begins: using it! The depth of flavor it brings to your recipes is unparalleled. You’ll find yourself reaching for it constantly, knowing that each drop infuses your dishes with authentic, nuanced vanilla essence.
Use it in all your favorite baked goods:
- Classic chocolate chip cookies
- Fluffy vanilla cakes and cupcakes
- Rich custards and puddings
- Creamy ice creams and sorbets
But don't stop there! Homemade vanilla extract isn't just for desserts. A dash can elevate savory dishes like glazes for ham or pork, or even subtly enhance sauces. And for a truly transformative experience, try adding a splash to homemade coffee creamers or hot chocolate – the difference is astounding. The rich vanilla flavor will give you the best coffee creamer ever, far superior to store-bought versions.
Embracing the simplicity of this
two ingredient simple diy vanilla extract project means elevating your entire cooking and baking repertoire. It’s an investment in flavor that pays dividends in every delicious bite.
Conclusion
Making your own pure vanilla extract is a culinary endeavor that perfectly blends simplicity with extraordinary results. With just two quality ingredients – vanilla beans and your chosen alcohol – and a dash of patience, you can create a vanilla extract that far surpasses anything you can buy in a store, both in flavor and purity. It's a cost-effective choice that frees you from the artificiality and high prices of commercial options. Beyond the kitchen benefits, homemade vanilla extract makes a heartfelt and impressive gift, demonstrating care and culinary prowess. So, take the plunge and embark on this rewarding DIY project. Your taste buds, and those of your lucky recipients, will thank you for the unparalleled richness and depth that only truly pure, homemade vanilla can provide.